Monday 29 November 2010

Lemon, Rosemary and Thyme Roast Chicken with Roast Potatoes


Roast chicken is a magnificent dinner dish at any time of year but especially on a cold, snowy night. The problem I often find with roast chicken, however, is that too many people over-complicate the roasting process. There is often too much emphasis placed on how to season the chicken, how and whether to stuff it and even how often to baste it. The preparation method I have used for this lemon, rosemary and thyme roasted chicken truly could not be much simpler and I hope to convince you that roasting a chicken need not be much more complicated than would have been boiling the egg from which it once hatched...


When roasting this chicken, I used simply the following:

1 4lb free range, organic chicken
1 whole, fresh lemon
1/2 tsp dried rosemary
1/2 tsp dried thyme

While the oven preheated to 375F/190C/Gas mark 5, I submerged the lemon in a pot of boiling water, where I let it simmer for ten minutes. I put the rosemary and thyme on a dessert spoon, which I then carefully inserted in to the cavity of the chicken and gently shook it around, to disperse the herbs as evenly as possible. After ten minutes, I removed the lemon from the water with a fork and held it in place on a chopping board in this way while I carefully pierced it several times with another fork. I then put it in to the cavity of the chicken and the chicken on to a non-stick baking/roasting tray. Heating the lemon in this way has the effect of causing the juices to escape and steam heat the chicken from the outset of the cooking process. I then put the tray in to the oven - no salt, no butter, no oil - for twenty minutes per pound and twenty minutes over, in this instance one hour and forty minutes. I did not baste the chicken, nor open the oven at all while it was cooking.


The roast potatoes which I served with the chicken were roasted in the fat of the chicken but do require to be cooked beforehand. They are small, new potatoes, so I added them (washed but unpeeled) to some cold, salted water as soon as the chicken was in the oven and brought the water to a boil. I then reduced the heat to allow them to simmer for half an hour. They were then drained and submersed in cold water until a few minutes before the chicken was ready. This process serves to expand and then contract the flesh, leaving the skins easily removable by hand. This takes seconds per potato as it literally just slips off the flesh by rubbing it with your thumb and should be done immediately prior to removing the chicken from the oven, otherwise the potato flesh will start to go black.


When the chicken is removed from the oven, it must be left to rest. If you are not using the chicken fat to roast potatoes, simply leave the chicken in the roasting tray and cover that with foil. If you are using the tray and fat to roast your potatoes, transfer the chicken to a heated dish, cover it with foil for fifteen minutes and leave it alone. Add the potatoes to the fat, swirl them around and stick the tray back in to the oven for around fifteen minutes.

When the chicken has rested, you may wish to carve it in a traditional sense. I prefer not to, especially with such a small bird. I like to separate it in to breast fillets, legs and thighs and wings. I do this with a sharp carving knife by cutting through the skin and flesh and the leg/thigh and wing joints before pulling them free and serving them as a choice of chunky and enjoyable chicken pieces. The way I do this is pretty similar to the way in which I butcher a whole chicken.

The skinned potatoes will take about fifteen to twenty minutes to cook in the chicken fat, which is perfect timing for carving (in whatever form) and serving your chicken. The peas are frozen and were simply added to boiling water for a few minutes before being drained and served immediately.

Sunday 28 November 2010

Spanish Tortilla with Bacon


There are certain times when, for whatever reason, we haven't been able to make it to the supermarket to purchase what we intended having for dinner. This may be due to time constraints, other circumstances beyond our control, or any one of a number of reasons. Today, my reason was the weather. The snow, the cold and the horrendous road conditions led to me taking a look in the cupboards and the refrigerator to see what I could come up with for dinner from the supplies I already had available and thus eliminate the need to go out.

I had plenty of eggs, bacon, onions and potatoes - among other ingredients - and quickly decided to make a Spanish style tortilla with bacon. Tortilla is a word which refers to different foodstuffs in different countries but in Spain it refers to a type of substantial omelette, incorporating vegetables, usually onions and potatoes. I had a bag of mixed vegetables in the freezer, some of which I decided I would boil up to serve as an accompaniment.

Ingredients for the Tortilla

3 eggs
4 rashers of bacon
1 medium to large potato
1 small onion
2 or 3 fresh basil leaves
Salt and freshly ground black pepper
Olive oil

Method

A Spanish tortilla will normally incorporate the potato and onion in a chunky and rustic fashion. I decided to take a slightly different approach on this occasion and use a finer and more symmetrical approach. I therefore sliced the potato and onion to a thickness of perhaps slightly just under 1/4". I used 7 slices of potato and four of onion in this dish.


It is necessary to cook the potatoes and the bacon prior to assembling the Spanish tortilla. Cooking the onion is optional but I have in this instance elected to do so. I added some olive oil to a frying pan and fried the potato slices over a medium heat for four minutes each side, the onion slices for one minute each side and the bacon until it was cooked but only just and not crisped. Note that this should be done in batches but there is no need to keep the component parts warm as they will be reheated during the cooking of the actual tortilla.


There are clearly no rules for assembling the Spanish tortilla. What I did here, however, was firstly wipe the pan (carefully - it will be hot!) with some kitchen towel. I then added some more olive oil and brought it up to a medium heat before forming a circle comprised of a potato slice, then onion, then potato, then bacon and repeat. I scattered the roughly torn basil leaves over the top of the meat and vegetables, before beating the eggs, seasoning them well with salt and pepper and gently pouring them over the top. The forming tortilla should be cooked over a medium heat until the egg is almost completely set.


The frying pan should then be placed under a preheated, overhead grill for a couple of minutes to finish setting the egg. When this is achieved, you may wish to scatter some grated cheddar cheese over the tortilla and put the pan back under the grill just until this melts and begins to bubble.


The Spanish tortilla with bacon is then ready to be served and consumed. You can either eat it as is, or half it to serve two, accompanied by perhaps the mixed veg I have used and some pickled beetroot. You may also wish to note that Spanish tortillas are also frequently eaten cold and are every bit as delicious.

Great Christmas Gift Ideas for Cooks 2010: Amazon Gift Cards

If the cook for whom you are trying to find a novel Christmas gift is particularly accomplished and well equipped in their kitchen, you may be struggling to think of what you can buy them. Why not consider in this instance presenting them with an Amazon Gift Card or Certificate? Although such a gift perhaps seems in some ways less personal, the benefit is not only that the cook in your life will be able to buy precisely what they themselves need or desire, they will be able to take advantage of Amazon's fabulous price discounts at the same time!

Amazon vouchers are not just for cooks, of course, nor for buying products related to cooking. Amazon sells such a wonderful variety of products that these gift cards or certificates make a wonderful gift for anyone at Christmas or any time of year.


Thursday 25 November 2010

Homemade Steak and Guinness Pie with Assorted Fresh Veg


Steak and Guinness make a fabulous combination in a puff pastry pie. I vividly remember the first time I ever tasted Steak and Guinness Pie. It was in a pub in Edinburgh, called The Last Drop, more than twenty years ago. It remains the best Steak and Guinness Pie I have ever tasted and I have sampled it many times over the years, particularly when I lived in Edinburgh for a time. It is made from The Last Drop's own secret recipe and is still prepared and served the same way to this very day. I can heartily recommend it if you ever find yourself on or near The Grassmarket, in Edinburgh's famous Old Town.

Steak and Guinness Pie is extremely easy to prepare at home, especially if you buy the puff pastry, rather than make it yourself. In this instance, I have served it with some boiled new potatoes in herb butter and fresh carrots and broccoli.


Ingredients (Serves Two)

1lb stewing steak
1 pint of Guinness
1 pint of fresh beef stock
1 tbsp plain (all purpose) flour
Pinch of fresh thyme
Little bit of sunflower oil for browning
5oz puff pastry
1 beaten egg for glazing
Salt and pepper

12 new potatoes
1 small head of broccoli
1 large carrot
Pinch of dried dill
Little bit of butter

Method

The cooking time for the steak will depend on the particular cut that you buy. Stewing steak such as this will cook in an hour, whereas shin of beef - as I often use - will take at least two hours. Simply let it simmer until the steak is tender but do ask your butcher if you require advice or a recommendation.

The flour should be added to a bowl and seasoned before the steak is tossed through it to ensure even coating. A little sunflower oil should be heated in a large pot before the steak is then quickly browned in it. The beef stock and Guinness should then be added and brought to a simmer, kept at same until the steak is tender.


It is important to allow the steak to cool completely, or at least considerably, before assembling the pie. Otherwise, the steam coming from it will make the underside of the pastry soggy and possibly cause it to collapse.

The cooled steak and enough of the gravy to almost completely cover it should be added to a pie dish such as this ashet. The pastry should then be rolled out large enough to cover the dish and leave sufficient offcuts to line the edges of the dish as shown. If you have any more pastry left over, you can use it to form a small design for the top of the pie, such as this Guinness Harp I attempted to fashion...

The pie should be lightly glazed with beaten egg and put in to an oven pre-heated to 400F/200C/Gas mark 6 for thirty to forty minutes, until the paste is risen and golden.


When the pie is in the oven, the potatoes should be washed and added to a pot of cold, slightly salted water, brought to a boil and then simmered for thirty minutes or until soft. The carrot should be scraped and chopped in to finger sized pieces and added to a separate pot of cold, salted water after about a further ten minutes to boil and then simmer. The broccoli head should be broken in to florets and added to the pot with the carrots ten minutes before everything is due to be ready.

The potatoes should be drained before being swirled in the butter and dill. The various ingredients can then be assembled on heated plates and served immediately.

Tuesday 23 November 2010

Recipes for St Andrew's Day: A Celebratory Feast of International Cuisine

Tuesday next (30th November) is St Andrew's Day. I think it is fair to say that a great many people who think of St Andrew - at least in terms of his being a Patron Saint - will think of him as being the Patron Saint of Scotland. While he is indeed the Patron Saint of Scotland, St Andrew is also, however, the Patron Saint of Russia, the Ukraine, Greece and several other territories. I have decided therefore to create an unusual post for this blog, in that it will feature not only a main course dinner suggestion for St Andrew's Night but three dishes for three courses, each one hailing from a different country of which St Andrew is the Patron Saint.

I am starting off with my version of Russian Borscht, a beetroot based soup. I will then move on to the Greek main course dish, Moussaka, and conclude with the famous Scottish pudding/dessert, Cranachan, made from among other things, fine Scottish single malt whisky.

Please note that all of today's recipes are quoted in quantities which will provide for four servings.

Starter/Appetizer - Russian Borscht


Borscht, like so many other similar soups, was originally a peasant dish. Its principal ingredient is beetroot but virtually any root vegetable can also be added, from potatoes, to turnips, to carrots. Beef is a common ingredient in Borscht and although I have incorporated beef, it would often be the case that the peasants who made the soup could not afford it. Omitting the beef of course will not only make the Borscht less expensive to prepare, it will make it suitable for vegetarians. I will forever remember my own first taste of Borscht, as that was in itself a truly international experience. Bear in mind that I am British, when I tell you that I first sampled this Russian dish, in Germany, where it was expertly cooked for me by an American friend!


Ingredients

3/4lb piece of inexpensive boiling beef (bone in)
4 small vaccuum packed cooked beets
1 medium potato
3 pints of fresh beef stock
1/2 tsp dried thyme
Salt and black pepper
Basil for garnish (optional)

Method

The beef will require long, slow boiling. It should be placed in to a pot and the stock and thyme added. The potato should be peeled, moderately finely diced and also added at this stage. This will allow it to partially break down and thicken the stock. The stock should be brought to a simmer and allowed to simmer gently for two hours. After this time, the beef should be lifted out with a slotted spoon, placed on a plate and covered for around fifteen minutes, until it becomes cool enough to handle.


When the beef has been removed, the beetroots should be coarsely grated in to the soup. The soup can then be allowed to continue simmering while the beef cools.


The beef should be shredded, either by hand or with two forks. It should then be re-added to the soup and simply allowed to heat through for about five minutes. At this stage the Borscht should be tasted, seasoned appropriately with salt and pepper and is ready to serve.

Borscht is commonly served with soured cream and fresh herbs, though it can equally be eaten as is.


Main Course - Greek Moussaka


Moussaka is a recipe which I have found can often incorporate a pretty lengthy list of ingredients. I have therefore tried to keep this as basic and simple as possible, without in any way compromising on taste.


Ingredients

1lb minced/ground lamb
1 14oz can of chopped tomatoes in tomato juice
2 aubergines (eggplants)
1 red onion
1 large garlic clove
1/2 tsp allspice
1/2 tsp ground nutmeg
Olive oil
Salt and pepper

2oz butter
2oz plain (all purpose) flour
12 fl oz milk

3oz grated cheddar cheese

Method


The aubergines (eggplants) should be washed, topped and tailed and sliced across the way in to 1/4" thick discs. They should then be layered in a colander, suspended over a bowl, each layer slightly salted. This will serve to remove any of the bitterness in the aubergines, though in many instances this has been bred out in modern times.

The garlic clove should be finely chopped and the onion halved then finely sliced. One tablespoon of olive oil should be heated in a large pot before the garlic and onion are added and stirred around for about five minutes, until the onion begins to turn transluscent. The lamb should then be added to brown and this may take up to a further five minutes. The tomatoes should then be added along with the nutmeg and allspice and the mixture brought to a simmer. It should be simmered for twenty minutes before being seasoned to taste and left to cool slightly while the aubergine preparation is completed.

After they have been draining for half an hour, the aubergines should be dried with kitchen paper before being fried for two minutes each side in a little olive oil then drained on more kitchen paper. This should be done in batches.


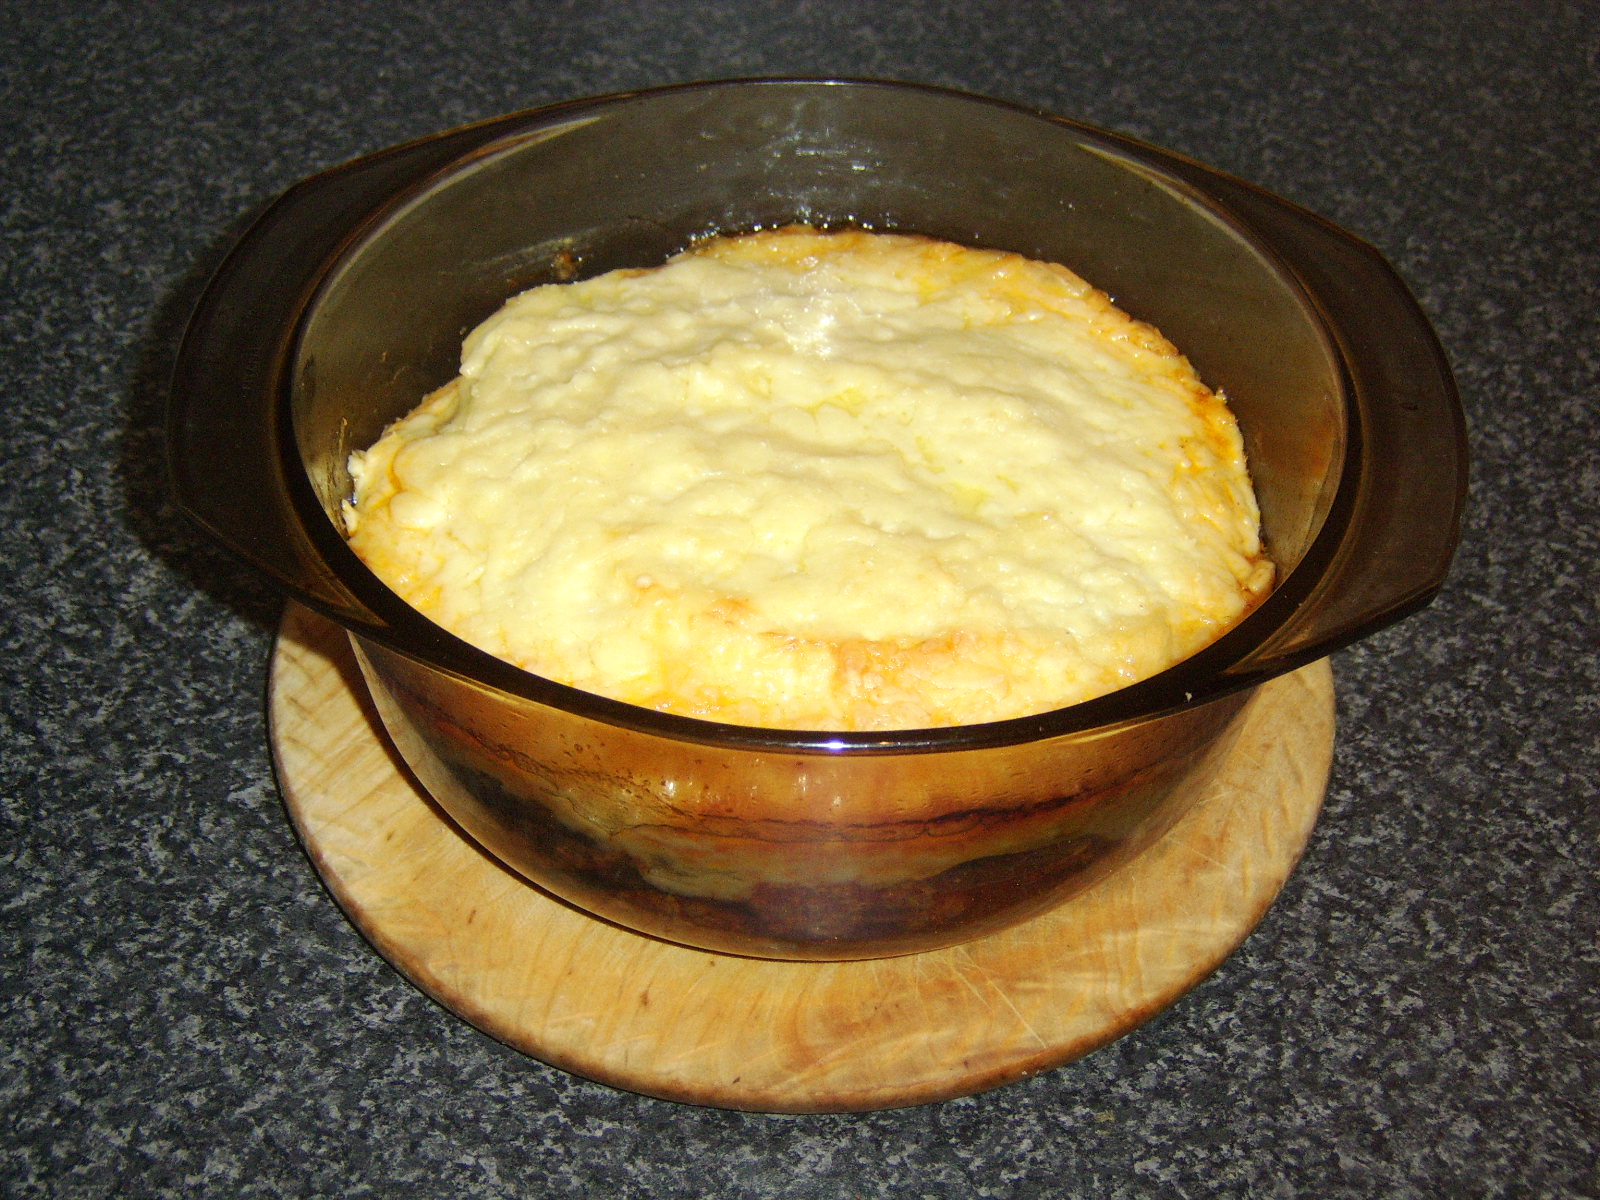
The bulk of the Moussaka is very simply assembled. Firstly, a layer of one third of the lamb mixture is placed on the bottom of an ovenproof dish, followed by a layer of aubergine. This should be repeated twice to produce three layers of both lamb and aubergine.


The bechamel sauce is easy and fairly quick to prepare. Firstly, 12 fl oz of milk should be heated in a pot before being transferred to a jug to keep warm. The butter should then be melted in the same pot before the flour is stirred in to form a roux. The roux should be cooked gently for a few minutes before the milk is re-added in stages to form a lush sauce. Note that the sauce should be fairly thick. It can then be spooned over the top layer of aubergine and the grated cheese scattered on top.

The Moussaka should be placed in an oven pre-heated to 350F/180C/Gas Mark 4 for forty-five minutes to an hour, until the cheese is bubbling and golden. It can then be removed from the oven and served with the accompaniment of choice. As the Moussaka is fairly substantial in itself, I have elected on this occasion merely to serve it with some sliced tomato and basil for garnish.


Pudding/Dessert - Scottish Cranachan


Cranachan recipes can be found of a great many varieties. I have tried to keep this as authentic, straightforward and delicious as possible but you may wish to eliminate the single malt whisky from any children's portions being prepared!

Ingredients

1/2lb fresh raspberries
2 tbsp medium oatmeal
4 tbsp quality Scottish single malt whisky (I'm using 10 year old Bowmore)
1/4 pint double (heavy) cream
A little liquid honey (optional)


Method

The raspberries should be washed and separated in to four individual serving bowls. A tablespoon of whisky should be spooned over each serving and at least half an hour allowed for the raspberries to soak up some of the single malt.

The oatmeal should be added to a dry frying pan and lightly toasted over a fairly high heat. This should only take a couple of minutes.

The cream should be beated to form soft peaks and spooned evenly over the raspberries. The oatmeal should be scattered on top and a little honey drizzled over last of all, if desired.


I hope that you have enjoyed reading this slight detraction from what can normally be found on this blog and that it has given you some ideas for celebrating St Andrew's Night in culinary style.

Great Christmas Gift Ideas for Cooks 2010: Chopping Boards

Chopping boards are often a much under-rated piece of equipment for all of those who love to cook. Consider for a minute just how many things require to be chopped when preparing a meal. It could be a piece of meat, vegetables, or fruits. Often, many of them require chopping at virtually the same time and chopping boards and small kitchens can become cluttered.

Chopping boards may for this reason be a very welcome Christmas gift for cooks, whether to complement or replace their existing utensil. Below are just some of the chopping boards you may wish to consider making a gift of this Christmas.

Monday 22 November 2010

Thanksgiving Dinner Alternative to Turkey: Sirloin Steak


One day last week, I featured on this blog a suggestion as to how those who are going to be forced to spend Thanksgiving alone in the USA this year could still enjoy a traditional, roast turkey, Thanksgiving dinner. There is another issue surrounding Thanksgiving dinner, however, which should be considered, in the sense that there are some people who quite simply do not like turkey. Whether such people are spending Thanksgiving alone, as part of a small group, or at a huge family gathering, they are clearly going to have to prepare or be served something other than turkey for Thanksgiving dinner.

Particularly where a turkey alternative for Thanksgiving dinner is to be prepared only for one person in a large group, the last thing anyone is going to want to do is offer something which is complicated, requiring a lot of individual time and attention. This is not being harsh to the unfortunate person who does not like turkey, it is simply a practical consideration. This is where sirloin steak makes an excellent choice as a turkey alternative (make sure your guest is not vegetarian!) as it can be very easily prepared properly as you attend to the other pots, pans and ingredients for the meal.

Where the sirloin steak is to be served only to one of the guests in a larger group, it can of course be very effectively accompanied by most of the turkey trimmings. Where you are preparing only sirloin steak, however, and no turkey, you may wish to consider this recipe in full.

Ingredients

1 thick slice of sirloin steak
A few small, new potatoes
A few Brussels sprouts
1 egg
1 tomato
Little butter
Salt and pepper
Pinch of dried dill
Pinch of dried nutmeg
Sunflower oil for frying

Method

The first step is to get your potatoes on to cook. They should be washed and added to a pot of lightly salted, cold water. They should be put on a high heat until the water starts to boil and then the heat may be reduced to achieve a simmer. Whole, new potatoes like this will take around thirty minutes' simmering to cook.

When the potatoes have been simmering for around ten minutes, it is time to cook the sirloin steak. This may be the stage where you have your turkey already out of the oven and covered with tinfoil to rest, giving you a little free time to attend to the dish for the person who does not like turkey. Prior to putting the steak on to cook, put a dinner plate in to the oven at a low heat. This will be needed to effectively rest the steak.

The steak can of course be griddled or grilled but I have chosen simply to shallow fry it in a frying pan. I am using a little sunflower oil to do so and bringing that up to a fairly high heat before I add the steak (seasoned on both sides with salt and black pepper) and reducing the heat to medium. When you are frying a steak, resist the temptation to move it around in the pan. The only time you move it during cooking should be to turn it. Different people like their steaks cooked to different extents (if you are the cook only and not the person who will be eating it, you should check!) and cooking a one inch thick sirloin such as this for five minutes each side will allow it to be served medium rare.

When you have turned the steak, the sprouts should be added to a pot of boiling water and allowed to cook for a total of ten to fifteen minutes, depending upon how big they are.


When the steak is ready, the plate should be removed from the oven and the steak transferred on to it. A large sheet of tinfoil should then be used to cover the steak and plate and wrapped securely around the edges to seal. Be sure to use oven protecting gloves for this process, as everything will be very hot! The tomato should then be halved and each half placed flat side down in to the pan vacated by the steak to fry for around five minutes.

The egg could be fried in the same pan as the tomatoes are cooking, especially if space is at a premium. I have used a separate small pan, however, with only the tiniest amount of sunflower oil. The pan should be fairly hot before the egg is broken firstly in to a small bowl and then inserted carefully in the pan. As there are a great many common mistakes made when frying an egg, you may wish to click here for some very helpful and practical tips and advice. The egg will take three to four minutes to fry.

Plating up involves draining the potatoes before returning them to the empty pot with a little butter and dried dill to be swirled around. The sprouts should be similarly drained before being swirled in butter and ground nutmeg. It is simply a matter thereafter of plating up the individual component parts of the meal as shown and serving your turkey alternative Thanksgiving dinner to your guest.

Saturday 20 November 2010

Pan Fried Coley Fillet with Spicy Salsa and New Potatoes


Coley, coalfish, saithe - all are different names for the same fish, a member of the cod family. Coley does not enjoy the same culinary reputation as its cousin, the cod, which is a shame, as it can be an excellent eating fish, provided it is cooked appropriately. It also retails at a fraction of the price of cod and is in much more plentiful supply than the seriously endangered cod.


The salsa for this recipe should be prepared first.

Salsa Ingredients (Serves Two)

2 medium tomatoes
3 spring/salad onions (scallions)
1 clove of garlic
1 small red chilli pepper
2 large basil leaves
1 tbsp extra virgin olive oil
Juice of quarter of a lemon
Salt and pepper

Method

The tomatoes should be halved and a teaspoon used to scoop out and discard the seeds and watery core. They should then be moderately finely chopped and added to a mixing bowl. The garlic clove should be peeled and finely chopped, while the seeds and membrane should be removed from the chilli before it too is finely chopped. (The salsa should not be so hot as to overpower the fish.) The spring onions should be finely sliced and the basil leaves finely torn before both are added. The lemon juice and extra virgin olive oil should be poured in, the salsa stirred well and seasoned to taste. It should then be covered with clingfilm and refrigerated until required.


When the salsa is in the fridge, the potatoes should be washed but not peeled and added to a pan of cold, slightly salted water. They should then be put on a high heat to reach a boil, before the heat is reduced to let them simmer for thirty minutes.

This is approximately a half pound fillet of coley. It is important that you purchase it with the skin still on. It will take five or six minutes only to pan fry, so it should start being prepared for the pan around ten minutes before the potatoes are ready.


An ounce of butter should be melted in a non-stick pan. The coley fillet should then be patted on the skin side only in some flour seasoned with salt and pepper, before being placed in to what should be the slightly browning butter, skin side down. The flesh side should then be seasoned with salt. It should be fried on a fairly high heat for three or four minutes until it can be seen from the side to have cooked most of the way through. The heat should then be reduced and the fillet turned on to the flesh side for the final couple of minutes.


The potatoes should be drained and returned to the pot with a little butter. The coley fillet should be added to the plate skin side up. Some salsa should be spooned on the side and the potatoes also presented. Whether the coley fillet is served with the skin on, or it is carefully removed with a knife beforehand, is entirely a matter of personal preference.

Great Christmas Gift Ideas for Cooks 2010: Bread Makers

There are few more pleasing smells in this world than that of freshly baked bread. Baking bread, however, in the traditional sense, is very much an art form. Knowing what yeast to use, how much, how long to leave the bread to rise and the extent to which to knead the dough are just some of the areas in which home cooks can go drastically wrong. That is where modern bread making machines can know such value to the amateur cook in your life.


How much would it extend the culinary repertoire of any cook who could successfully begin producing their own bread for the first time? Consider how many meals we eat which incorporate bread of some type. Be it toast at breakfast, sandwiches for lunch, or small bread rolls to accompany dinner, the usage which can be obtained from a bread machine is phenomenal.

Below are some ideas of the bread machines currently available on Amazon. Click on a link for full details, to see how much you are saving and to purchase a Christmas gift for your favourite cook that will give them endless fun and satisfaction.


Perhaps you may also wish to purchase a bread recipe book to accompany your gift of the bread machine? After all, the machine itself without a recipe is of little practical use. Alternatively, if your special cook already has a bread machine, these books may still prove very practical.

Steak Fajitas with Homemade Guacamole and Cheese


Fajitas are not the traditional Mexican dish many people think. They are rather a product of the, "Tex Mex," cuisine culture, which is largely a development of Mexican immigrants to the United States, making the most of the ingredients available in their adopted country. Fajitas were originally produced using skirt steak but have of course now developed to incorporate a great many different meats, particularly chicken. Skirt steak is not generally known for its tenderness, so any type of frying steak can actually be used in this recipe.


Ingredients per Serving

1/4lb frying steak
1 red bell pepper
1 small onion
2 closed cup mushrooms
Salt and pepper
Sunflower oil for frying

1 small ripe avocado
1 red chilli pepper
1 clove of garlic
Juice of 1/4 lemon

2oz grated cheddar cheese

3 tortilla wraps

Method

Ideally, the guacamole should be prepared an hour or more in advance. This will allow the flavours time to infuse. It is vital that the avocado be fairly ripe in order that it can be peeled and de-stoned effectively. Note that not all varieties of avocado darken in colour as they ripen and the way to judge ripeness is that they should be moderately soft to the touch. For full details on how to effectively and safely de-stone and peel an avocado, click here.

The avocado should be put in to a small bowl with the lemon juice and mashed with a fork. The red chilli pepper should be de-seeded, finely chopped and added to the mix, along with the peeled and grated garlic clove. Salt and pepper should be added, the guacamole stirred well and covered with clingfilm, to be refrigerated until required.


The serving dish will require to be pre-heated, so prior to starting frying, I placed it in to a low to medium oven. I have used a wok to cook the meat and vegetables in this recipe but a large, deep frying pan will suffice. The wok should be brought up to a high heat and around one tablespoon of sunflower oil added. The steak should be cut in to strips and fried quickly to seal the meat. The heat should then be reduced slightly and the pepper, onion and mushroom added to the wok, to stir fry for a couple of minutes. The heated serving dish should then be removed from the oven to a wooden board and the hot steak and vegetables dished up.


The tortilla wraps served here were supermarket bought but making them yourself is a fairly straightforward process. The wraps should be presented on a dinner plate, along with the grated cheese and the guacamole in small bowls.

There are no rules for assembling steak or any other form of fajitas. What I like to do, however, is spread a little guacomle on the tortilla, add some steak and veg and top it off with cheese before rolling it up.