Sunday, 27 February 2011

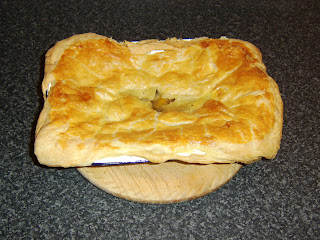
Lamb and Turnip Pie, Chips and Beans


There are principally two types of savoury pie which are widely enjoyed here in Scotland. There is firstly the Scotch pie, a pie made from minced/ground lamb or mutton and encased in hot water pastry. Scotch pies are the staple half-time snack at football (soccer) matches, or are frequently eaten at home with chips and baked beans in tomato sauce. There is secondly the steak pie, comprised of stewing steak and link sausage, covered by puff pastry. I suddenly came up with the idea a few days back of preparing a fusion of the two ideas and the result is this dish: my alternative pie, chips and beans. Adding turnip was a last minute decision, to incorporate extra colour and texture and I was happy with the way it fitted in.

I have featured the way in which I make chips on this blog many times, a method based on that first suggested by the celebrity chef Heston Blumenthal. Despite being delighted with the results of this method of chip preparation, this does not mean I am not forever looking to improve on it. One of the biggest factors to consider when making good chips is the type of potato which you use. When I saw these Innovator potatoes in my local Morrison's and the claim on the bag that they are, "Excellent," for making homemade chips, I had to give them a try.


Ingredients for Two People

1/2lb diced leg of lamb
1/4 small Swede (yellow) turnip
1/2lb puff pastry
1 pint fresh chicken stock (UK pint, ie 20 fl oz)
2 large Innovator potatoes
2oz small green beans
1 small beaten egg for glazing
Salt and pepper

Method

The potatoes should be peeled, sliced and chopped in to chips. Add them to a large pot of cold water and put on to a high heat. When the water boils, reduce the heat and allow the chips to simmer for five minutes only. Drain them carefully through a colander and put them in to a bowl of cold water for a few minutes to cool. Drain them again and lay them in a single layer in a Tupperware dish. When completely cool, refrigerate for a minimum of half an hour.


The lamb should be quickly browned in a dry pot, stirring all the time with a wooden spoon. The chicken stock should be added and brought to a gentle simmer. Season with salt and pepper and continue to simmer very gently for forty-five minutes. After this time, cover the pot and set aside to cool.

The chips are going to be deep fried twice. When they are removed from the refrigerator the first time, it is necessary to carefully pat them dry on a clean tea towel. They should then be placed in a deep frier at a moderate heat for five to six minutes, until they only just begin to colour. Remove them, drain them on kitchen paper and allow them to cool. They then go back in to the Tupperware/plastic container and the refrgerator for a further half hour.


Peel the turnip/Swede and chop it to a 1" dice. Mix it with the cooled lamb and stock and add the lot to a 10" x 7" pie dish. Roll out the pastry on a dry, floured surface until it is large enough to cover the dish with about a 1" border all the way round. Lay the pastry carefully on top of the pie dish and tuck/crimp it around the edges. Glaze with the beaten egg and do not forget to make a "+" in the centre, each arm of which should be about 1" in length. This allows the steam to escape during cooking. Place in to a preheated oven (375F/190C/Gas Mark 5) for around forty minutes, until the pastry is beautifully risen and golden.


When the lamb and turnip pie is ready, remove it from the oven and set it aside to cool a little while the chips are finished and beans prepared. This allows the lamb to rest slightly.

The chips should now be fried for the second time, at a slightly higher heat, until beautifully crisp and golden. This will take anything from five to seven minutes. When the chips are in the frier, the beans should be added to a pot of boiling, slightly salted water. The chips should again be drained on clean kitchen paper and the beans drained through a colander. The pie should be divided between two plates and the meal can now be served.

Tuesday, 22 February 2011

Mushroom Stuffed Fillet of Pork Tenderloin with Radish and Rocket Salad and Garlic Toast


Stuffed fillet of pork tenderloin is very often wrapped in bacon before it is tied and cooked. The bacon fat helps to keep the pork moist. This was precisely what I was about to do on this occasion, when I had an idea: I wondered how it would work if the bacon were actually to be placed on the inside of the fillet of pork tenderloin. I decided that there was only one way to find out and was more than delighted with the result, which provides a very different, alternative stuffed tenderloin recipe.

The quantities today are for one person.

Ingredients

1/2lb fillet of pork tenderloin
2 rashers of bacon
1 closed cup mushroom
2 cloves of garlic
1 tbsp olive oil
Pinch of dried sage
Handful of fresh rocket leaves
Half small red onion
6 radishes
Salt and white pepper
4 slices of French stick bread

Method

The first step is to prepare the mushroom stuffing for the pork tenderloin. The closed cup mushroom should be wiped clean and finely diced. The garlic clove should be peeled and equally finely chopped. The olive oil should be placed in a small saucepan and the garlic, mushroom and dried sage added. Season with salt and white pepper. Gently sautee for two to three minutes only. Set aside for ten to fifteen minutes to cool, while the oven preheats to 375F/190C/Gas Mark 5.


The fillet of pork tenderloin should be laid out on a board with the opened side uppermost. This is the side which has a small groove running down the centre. The cooled mushroom mixture should be used to fill the groove in the centre of the tenderloin.


The bacon should be placed carefully on top of the mushrooms. Note that three or four rashers of streaky bacon could be used here instead.


Three pieces of string about eight inches in length will be required to tie up a pork fillet tenderloin of this size. Slip them under the tenderloin at equal spaces. Gently gather the two long edges of the tenderloin together and tie the pieces of string with simple knots. Place in the centre of a large sheet of tinfoil on a baking tray and fold the tinfoil in to a sealed parcel, similar to a Christmas cracker. Place the tray in the oven for twenty-five minutes.


When the pork is ready, remove it from the oven and set aside for at least ten minutes to rest while the salad and garlic toast is prepared. The radishes should be washed and halved, ensuring that any remaining stem is removed and discarded. The red onion half should be finely sliced. They should both be tossed with the rocket leaves and a little salt and white pepper, before being arranged on a plate as a bed for the pork. Extra virgin olive oil is optional.


The slices of bread should be put on a grill pan and under a hot overhead grill to toast on both sides. While they are toasting, the second garlic clove should be peeled and lightly crushed. This should be rubbed over both sides of the hot toast as soon as it comes off the grill to impart its delicious flavour.


The fillet of pork tenderloin should be sat on a chopping board. The string should be cut with scissors, gently pulled free and discarded before the fillet is sliced to a thickness of about half an inch. The slices should be arranged atop the salad, before the garlic toast is added and the dish served.

Monday, 21 February 2011

Rainbow Trout Steamed in White Wine with Fresh Mixed Salad


It has been quite some time since I last featured rainbow trout on this blog and given that it is likely to be classed as a sustainable species of fish, I thought it was time to put that right. Rainbow trout is native to North America but it was introduced to British waters many years ago. It is widely farmed and many waters are regularly stocked for the benefit of anglers. This recipe may therefore be perfectly suited to anyone who has just been on a successful fly fishing trip.

This recipe is for two people.

Ingredients

2 small rainbow trout
4oz pack of mixed green salad leaves
1/2 a red onion
12 to 15 pitted black olives
2 whole sprigs of fresh dillweed
2 tbsp dry white wine
2 tbsp extra virgin olive oil
Salt and white pepper
Fresh bread as an accompaniment

Method

The only cooking involved in this recipe is of the rainbow trout. Getting the trout in to the oven is therefore the first step. The oven should be put on to preheat to 375F/190C/Gas Mark 5.

The trout should be gutted (have your fishmonger do this for you if you like) but otherwise left whole. They should then be washed thoroughly under running cold water. Line a deep baking tray with tinfoil. Season the cavities of the fish with salt and white pepper and place a whole sprig of dill inside. Lay the trout on the foil and pour the wine over the top. It may not seem like much wine to use but the idea is to steam the trout, not poach them like in a fish kettle.

Take a second sheet of tinfoil and use it to cover the tray, making sure it is tucked in well at the edges to seal the fish inside and prevent the steam escaping. Place the tray in to the oven for twenty minutes. (Note that larger fish will take longer, with the rule of thumb for larger rainbow trout being approximately fifteen minutes per pound.)


While the rainbow trout are baking/steaming, the salad should be prepared. The salad leaves should be placed in a dish large enough to accommodate the trout. The red onion half should be sliced, separated in to strips and added along with the olives. The olive oil should be poured over the top and the mix seasoned with salt and white pepper prior to being carefully tossed.


The baking tray should be removed from the oven with oven protecting gloves and the tinfoil very carefully pulled aside, as the escaping steam can cause painful burns. Take a metal skewer and pierce each fish at its thickest fleshy part. Significant resistance means that more cooking time is required. Using a fish turner, lift the fish and place them on top of the salad.

Serving the trout is possible in a number of ways. You may wish to take the dish as pictured at the top of this post to the table and serve at that point, or alternatively, you may wish to separate the trout in to big flakes to scatter over the salad as below. Either way, some fresh crusty bread serves as an excellent accompaniment.

Note: The latest of my dedicated sustainable fish recipe sites to be updated is this one:

Awesome Recipes for Sustainable Fish

Friday, 18 February 2011

Spice Roasted Turkey Breast with Rocket, Beetroot and Mozzarella Salad and Pan Roasted Potatoes


There are of course a lot of people who would never think of having turkey for dinner in the middle of February. It is widely perceived as being a dish for Christmas or Thanksgiving and eaten only at these times of year. Turkey is, however, available in most of our supermarkets all year round and makes a delicious, low fat dinner in a great many ways, at any time of year.

This recipe is for two people and uses a turkey breast fillet of just over a pound.

Ingredients

1 turkey breast fillet
3 large potatoes
Generous handful of fresh rocket leaves
Mozzarella ball of approx. 4oz
1 small cooked beetroot (bought vacuum packed - not pickled)
1 tsp hot chilli powder
Salt and black pepper

Method

The potatoes should be peeled and chopped in to chunks. They should be added to a pot of cold water and put on to a high heat until the water boils. The heat should then be reduced to a simmer for twenty minutes. The potatoes should be drained and added to cold water for a few minutes to cool. They should then be placed in a Tupperware dish and refrigerated while the remainder of the meal is prepared.

The chilli powder should be seasoned with salt and pepper and rubbed in to the turkey breast. This can be done a couple of hours in advance if desired. The turkey should then be wrapped in a loose foil package, placed in a baking tray and in to the oven, preheated to 400F/200C/Gas Mark 6, for twenty-five minutes per pound.


The turkey should be removed from the oven and checks made to ensure it is fully cooked. Stick a fork or skewer in to the thickest part and check that the juices run clear. Refold the foil package and set aside to rest while the potatoes are pan roasted and the salad prepared.

The potatoes should be firstly dried in a clean tea towel. They should then be deep fried for six to eight minutes until crisp and golden.

While the potatoes are frying, the mozzarella and beetroot should be roughly diced and mixed with the rocket in a bowl.

The turkey should be sliced and plated along with the salad. The roasted potatoes should be drianed on kitchen paper and added last of all.

Tuesday, 15 February 2011

Whiting Fish Curry with Easy Pilau Rice and Indian Spiced Onions


In this latest recipe for sustainable fish and seafood, I decided to make something a little bit different. Not many people think of fish when they think of curry but fish curry is extremely popular in parts of India - such as Goa - so I decided to come up with a very simple recipe of this type. Please remember also the resources in the right hand column of this blog for sustainable fish recipes, including the site linked to below which contains recipes for a number of different sustainable species and was updated with a new recipe earlier today. All will aid supporters of the campaign for eating more sustainable fish to keep their fish recipes varied and interesting.

Delicious Recipes for Sustainable Fish and Seafood

I have used whiting in this particular recipe for two people, which is actually a member of the cod family and is considered by many to be every bit as tasty as its seriously endangered cousin. The first step, however, should be to prepare the spiced onions, as they will ideally require a couple of hours in the refrigerator for the flavours to infuse.

Spiced Onion Ingredients

1 large white onion
1 tbsp tomato ketchup
1 tsp hot chilli powder
1/2 tsp ground fenugreek
1 tsp caster sugar
1 tsp fresh lemon juice
6 fresh mint leaves
Salt to taste

Method

The onion should be peeled and either diced or sliced, depending upon preference. It should be added to a glass bowl. The mint leaves should be roughly chopped and added to the onion along with the remainder of the ingredients. Stir carefully and very well. Cover with clingfilm and refrigerate for at least a couple of hours. Note that this could be done the night before where time is going to be an issue.


Fish Curry and Rice Ingredients

2 large whiting fillets
1 pint jar of curry sauce (strength as desired)
6oz basmati rice
1 and 1/2 pints of water
1 2" cinnamon stick
4 whole cloves
2 cardamom pods
2 bay leaves
Salt

Method

The spices should be placed in a large pot and the water and a little salt added. Put the pot on to a high heat for the water to reach a boil. While the water is heating, rinse the rice thoroughly in a sieve under running cold water. Add the rice to the boiling water and stir well, once only.

When the rice is added to the water, add the curry sauce to a deep frying pan and put on to the heat to reach a simmer. When it is simmering, add the whiting fillets and fry for four minutes, before turning them very carefully with a fish turner and cooking for a further four minutes.


The rice is ready after ten minutes. Drain it through a sieve and use a teaspoon to remove the bay leaves, cinnamon stick, cardamom pods and be sure particularly to remove all the cloves. Stray cloves can lead to urgent dental assistance being required...


The rice can simply be spread on the plate as a bed upon which to serve the curried whiting. I have instead, however, lined a small bowl with clingfilm, packed in the rice and upended it on the serving plate. The bowl should then lift away and the clingfilm peeled free. The whiting can then carefully be plated and some of the curry sauce spooned on top.

The spiced onions should be removed from the refrigerator and a generous spoonful added to each plate.

You may also wish to consider serving this dish with some incredibly simple, homemade chapatis. You can find my simple recipe instructions for chapatis by clicking here.

Sunday, 13 February 2011

Valentine's Dinner for One: Pork Schnitzel with Braised Savoy Cabbage and Potato Salad


Tomorrow is St Valentine's Day, which is widely celebrated around Planet Earth. It is a time when people try to be with that special person who means most to them and very often sharing a romantic Valentine's meal together will form a big part of the occasion. I didn't think I was going to have time to prepare a Valentine's Day feature for the blog this year but when I hit on this idea, I knew I had to make the time.

I decided to dedicate this post to those who are spending St Valentine's Day alone this year, especially where this is not through choice. This may be as a result of recent bereavement, the end of a relationship or marriage, or perhaps the fact that distance separates loved ones through unavoidable circumstance, with those serving in our Armed Forces around the world and their loved ones being the obvious consideration. Today's post is therefore dedicated to encouraging all who are spending Valentine's Day alone in 2011 not to dwell on the fact but to prepare themselves a special meal and enjoy the food...along with a glass of wine or two! The particular recipe is not important - the act of taking the time to prepare something is! It is, after all, simply another day but if you are in this situation and not feeling too good about it, you may find the article linked to below of some use.

Tips on How to Survive Valentine's Day Alone

Okay, on with the recipe. Schnitzel is an Austrian dish, most commonly made with veal, as in the case of the world famous Wiener Schnitzel (Viennese Schnitzel). Schnitzel is also made, however, with a number of other meats, particularly in Germany. Pork is one of those meats which is commonly used and the one I have elected to use on this occasion. Frequently, German schnitzels can be larger than the average dinner plate and I have tackled a great many in Germany which I knew beforehand I would never be capable of finishing. This, however, is a recipe for a schnitzel of more moderate size.

Ingredients

6oz leg of pork steak
2 medium potatoes
4 savoy cabbage leaves
1/2 small white onion
1 tbsp canned sweetcorn with peppers
2 tbsp low fat mayonnaise
1 clove of garlic
6 fresh mint leaves
2 slices of bread
1 egg
Pinch of dried sage
Salt, white pepper and black pepper
Sunflower oil for frying
Fresh lemon wedge for garnishing

Method

The potato salad will require to be prepared first. The potatoes should be peeled and diced. The size of the dice depends upon your own preference but in this instance I went for just under half an inch. The diced potatoes should then be placed in to a pot of cold, lightly salted water and on to a high heat until the water begins to boil. Reduce the heat and simmer for five minutes only.


The potato pieces should by know be fairly soft. Take one out with a spoon, let it cool and taste to ensure this is the case. Drain the potatoes through a colander and plunge them in to a bowl of cold water to quickly cool them. After a couple of minutes, drain again, add them to a large plastic lidded dish and refrigerate for half an hour. Cooling them like this will serve to help prevent them breaking up in the mayonnaise.

Mix the potatoes with the tablespoon of sweetcorn and peppers in a mixing bowl. The remaining sweetcorn and peppers will keep refrigerated in a plastic dish for a couple of days, to be later used as desired. Peel and grate the garlic clove in to the bowl. Add the mayonnaise and the roughly chopped mint leaves, season with salt and white pepper, stir carefully but well and cover with clingfilm. Refrigerate again while the remainder of the meal is prepared.


The two slices of bread should be made in to breadcrumbs and spread evenly on a dinner plate. The egg should be broken in to a wide bottomed bowl and beaten.

The pork leg fillet will require to be pounded and flattened. Ideally, a meat mallet should be used for this purpose but a simple rolling pin will suffice. One top tip here is to not beat the unprotected meat. Instead, lay a large sheet of clingfilm on a chopping board and the pork fillet on top. Season the fillet at this time with salt and black pepper. Cover with another large sheet of clingfilm. Pounding tender meat like pork or chicken in this way helps it keep its form and not disintegrate. Remember also to pound it lightly - it is not a tough and thick beef steak!


Your pork pounded, you should add a generous amount of sunflower oil to a large, non-stick frying pan. At least a couple of tablespoons. Put it on to a medium heat and draw your pork through the egg, then the breadcrumbs and - very importantly - repeat. Doing this twice will ensure a thick and even coating. Place the breaded pork fillet carefully in to the frying pan. It will take around five minutes each side to cook, leaving a beautifully golden, crisp coating finish.


Roughly shred the savoy cabbage leaves and slice the white onion. Add around a tablespoon of sunflower oil to a medium sized pot, heat and add the savoy cabbage and onion. Season with salt, freshly ground black pepper and the pinch of dried sage. Cook over a medium heat, stirring frequently, until the pork schnitzel is ready.

It then remains simply to plate your pork shnitzel, stir fried cabbage and potato salad and garnish with the lemon wedge. The lemon should be squeezed over the schnitzel immediately prior to eating.

Thursday, 10 February 2011

Man Size Mixed Grill with Side Order of Chips


A mixed grill is perhaps not quite in keeping with the reputation for healthier eating recipes I promised to acquire for this blog at the New Year. In my defence, I did say that I would include principally healthy eating options. I am also grilling as part of this recipe, as opposed to frying, and where I am frying, I am using sunflower oil rather than saturated animal fat. I hope therefore that you will consider giving this delicious recipe a try - perhaps on behalf of a hungry husband you may have coming in from work!

The chips for this dish are optional. For this reason, as well as the fact that I have included my chip preparation method many times before on this blog, I am detailing only how to make the mixed grill. My chip preparation method can, however, be found by clicking here.

Ingredients for One Man Size Mixed Grill

1 sirloin steak
1 turkey breast steak
4 rashers of bacon
2 beef link sausages
1 slice of black pudding (blood pudding/blood sausage in USA)
1 egg
1 slice of bread
1 tomato
Half a white onion
3 closed cup mushrooms
Salt and freshly ground black pepper
Sunflower oil for frying

Method

This recipe will require two frying pans, one small and one large. The sausages will take longest to cook so it is important to get them on to fry in the first instance. Put a little sunflower oil in to the smaller frying pan and add the sausages. Put on a fairly low heat, as you don't want the sausages to burst. Turn them every few minutes and after about fifteen minutes, add the slice of black pudding. The black pudding will take about five minutes each side.


When the black pudding is on, put some sunflower oil in to the larger frying pan and bring it up to a medium heat. The turkey steak should be added to fry for five minutes each side. The sirloin steak should be seasoned with salt and pepper and added two minutes later to fry for four minutes each side.

The tomatoes should be halved, the onion half thinly sliced and the mushrooms simply wiped clean with a dry piece of kitchen towel. The tomatoes should be added to the pan with the steaks - skin side down - and the mushrooms and onions beside the sausages and black pudding. This is variable - I did it this way simply due to the available room in each pan.

When the meat is ready, the sausage, black pudding and the steaks should be transferred to an oven warmed plate to rest/keep warm and covered with tinfoil. The mushrooms and the onion should be transferred to the same pan as the tomato over a very low heat to keep warm.


A hole should be cut in the centre of the slice of bread with an egg cup. The small frying pan should be brought up to a medium heat (a little more oil may be added if required) and the bread added.


The egg should be carefully broken in to a small bowl and poured on to the bread that the yolk will settle in the hole. After three minutes, the bread should be turned with a fish turner and cooked for a further three minutes.


The bacon should be grilled under a hot overhead grill, started just before the eggy bread is turned. It will only take a couple of minutes each side. The dish may then be plated.


Place the bread on one side of the plate and the bacon rashers on the other. Add the onion, tomato, mushrooms and black pudding on top of the bacon. The turkey and sirloin steaks should be sat atop the eggy bread and the sausages placed alongside.