King scallops are a deliciously sweet type of shellfish. Soft and succulent, they almost seem to melt in the mouth - provided that they are cooked in the correct fashion. The recipe described below is for one person and includes details of the most common way in which I like to cook scallops.
Ingredients
5 or 6 Scottish King scallops
1/2lb potatoes
2 tbsp frozen peas
Circa 1 pint of milk
1 tbsp freshly chopped parsley (plus sprig for garnish)
1 clove of garlic (crushed or grated)
1 tbsp double (heavy, in USA) cream
1 tsp quality single malt Scotch whisky
Method
The first step is simply to peel and chop the potatoes and place them in to a pot of boiling, salted water. They will take around twenty-five minutes to cook.
It is important to note with scallops that the orange coral should be left intact. It is delicious! Far too many people are under the gross misapprehension that this is something to be discarded. Scottish King scallops in particular are expensive enough without discarding part of them uneaten.
After the potatoes have been on for around twenty minutes, the scallops should be added to a separate pot and enough cold milk added to completely cover them. They should not be seasoned in any way - no salt, no pepper, no herbs: nothing! It is the purely natural flavour of the Scottish King scallops that we want and not something imparted by an alien substance.
The pot containing the King scallops and milk should then be put on to a moderate heat and cooked only until the milk just begins to simmer around the edges. It must not be allowed to come to a boil. At this stage, the Scottish King scallops are cooked and should be removed from the pot with a slotted spoon to a warmed plate.
The peas will take around three minutes to cook in a separate pot in boiling water and should be put on immediately after the scallops, to be drained after this time has elapsed. The potatoes should then be drained and mashed with a little of the scallop poaching liquer, the garlic and the parsley.
The whisky cream sauce takes mere seconds. The cream and the whisky should be added to a very small saucepan and the pan heated while you stir with a wooden spoon on a very gentle heat until the sauce barely starts to simmer.
The potatoes should be added to the plate first and arranged in the form of a circular bed for the Scottish King scallops. The peas should then be placed around the edges, the scallops on top of the potatoes and the sauce drizzled very lightly over the scallops. The small sprig of parsley should be used as the final garnish.
How often do we ask ourselves the question, "What should I have for dinner tonight?" Twice a week, four times a week...every night? This blog is designed to help all of those wondering what they should have for dinner tonight by offering a wide range of tasty and healthy suggestions as to what should form your dinner tonight or any night. I very much hope that you will bookmark this page and return to it on a regular basis to try out some of the recipes.
Friday, 29 January 2010
Wednesday, 27 January 2010
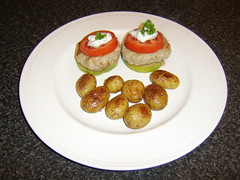
Pork, Apple and Chilli Burgers with Garlic Roast Potatoes
There is nothing difficult about making burgers at home and, in this way, they are far more nutritious and enjoyable than any from a Fast Food restaurant or a supermarket. The added beauty of making burgers at home is that we can be so creative, not only in the type of meat which we use to make the burgers, but in the additional ingredients which we add to them.
I have made these pork, apple and chilli burgers many times over the years and although I would not go so far as to say that they are one of my favourite foods, they are probably my favourite type of burger that I have thus far created.
This recipe is for two (hungry) people and is prepared from start to finish in around thrity-five to forty minutes.
Ingredients
- Burgers
1lb minced/ground free range, organic pork
1 Granny Smith apple
1/2 small onion (finely chopped)
1 clove of garlic (crushed or grated)
1 small red chilli pepper (very finely chopped - deseeding is optional)
1 small egg
2 tbsp fresh breadcrumbs
Salt and freshly ground black pepper
- Garlic and Herb Mayonnaise
2 tbsp low fat mayonnaise
1 tbsp finely chopped parsley
1 garlic clove (crushed or grated)
- Potatoes
14 to 16 baby potatoes
1 clove of garlic (crushed)
Salt
1 tbsp sunflower oil
- Garnish
1 tomato
Sprig of fresh parsley
Method
The first step in this recipe is to prepare your garlic and herb mayo. This is in order to allow the flavours to permeate through the mayo and ensure it is enjoyed at its very best. This step can even be taken the night before, or earlier in the day. Simply mix the three ingredients well together in a small bowl, cover with clingfilm and refrigerate until required.
The potatoes should then be added to a pot with a little salt and enough boiling water to cover them - note that they should not be peeled. They should be simmered for fifteen minutes while the oven heats. The sunflower oil should then be added to a baking tray which should be placed in the oven and the oven put on to preheat to 400F/200C/Gas Mark 6.
Once the potatoes are on to boil, the burgers should be prepared. Note that if the seeds of the chilli are incorporated, the burgers will be a lot spicier.
All of the burger ingredients should be added to a large mixing bowl or basin, with the exception of the apple. The apple should be cored and four slices about 1/4" thick cut from the centre for later frying. It is imperative that these slices be immediately immersed in a small bowl of cold water, to prevent them from turning brown. The remainder of the apple should then be peeled, finely chopped and added to the other burger ingredients.
The burger ingredients should then be mixed very thoroughly by hand, before being divided in to four portions, rolled in to balls and flattened in to patties.
When the oven is heated, the potatoes should be drained thoroughly and added to the tray of hot oil. They should then be gently and carefully shaken around in the oil to ensure even coating before being placed in the oven for a total of twenty minutes' cooking time.
A little sunflower oil should be added to a non-stick frying pan and the burgers added to be fried for ten minutes each side. After the burgers are turned, the potatoes should be removed from the oven and the tray once again gently shaken.
When the burgers are ready, they should be removed from the frying pan to a plate and the two apple slices added to the vacated pan. The heat should be turned up to high and the slices fried for about one minute each side. While the apple slices are frying, the potaotes should be removed from the oven and added to a colander lined with kitchen paper to drain. They should then be placed in to a bowl with a crushed garlic clove and gently swirled around to obtain a garlic coating.
It is then time to plate up the meal by placing the apple slices on to the plates, the burgers on top, a slice of tomato on top of each burger and a teaspoonful of the mayo on top, garnished with a little bit of parsley. The potatoes should be added alongside.
Tuesday, 26 January 2010
King Prawn Fried Rice
After my traditional Scottish food venture of the past week, I decided that I was going to eat Chinese tonight. As I love both seafood and rice, I decided to have a King Prawn fried rice. I toyed with the idea of preparing a sauce to go with it but decided that I wanted it just the way it is in the picture. I have no regrets...
The thing which I like best about fried rice is that it is so versatile in the way in which it can either be used as a meal accompaniment or have any number of ingredients added to it in order to make the body of a meal itself. This recipe is for two people.
Ingredients
10 to 12 King prawns (shelled and de-veined)
4oz basmati rice
1 small onion (halved, then finely sliced)
1 clove of garlic (very finely chopped)
1 tbsp dark soy sauce
1 tbsp roughly chopped coriander (cilantro in USA)
2 tbsp corn oil
Salt and freshly ground black pepper to taste
Method
The first step here is to wash the rice thoroughly in cold water and then boil it for twelve minutes in salted water. When it is done, it should be rinsed in cold water again in a sieve to cool it and shaken extremely thoroughly to remove as much of the water as possible. The rice may then be left in the sieve - over a bowl or pot - to drain as much as possible while the remaining ingredients are prepared.
When cooking King prawns - or indeed any form of shellfish - it is absolutely imperative that they not be over-cooked. The texture which they will assume should that be the case will be akin to rubber and they are likely to be quite inedible.
The wok should be brought up to a very high heat and the corn oil added. When the oil is heated, the King prawns should be added and stir fried for around thirty seconds before the onion and garlic are added. The soy sauce and the rice should then be added and the ingredients stirred for another couple of minutes. The heat should then be turned off before the seasoning and chopped coriander/cilantro are stirred through. The dish should now be served, garnished with a little more coriander.
Monday, 25 January 2010
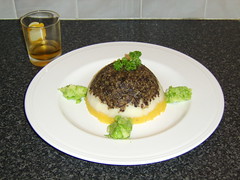
Whisky - with Haggis, Tatties and Neeps
January 25th is of course the big night itself, the birthday of Scotland's Bard, Rabbie Burns. Tonight, Burns Suppers will be held around Planet Earth and The Bard's work will be recited and sung - while his national drink is drunk! Pictured to the right is the meal I have only moments ago finished (click on the image to enlarge it) and the recipe follows below. First of all, however, there is a certain formality which very much requires to be observed...
The Address to a Haggis is recited at every genuine Burns' Supper and constitutes the words of the poem of that name written by Burns. Very often - as in the video below - the Haggis will be piped in to the table before an honoured guest will give the required address. Even though you may understand little of it, I hope that you will spare a couple of minutes to watch the proper, Scottish address to the haggis as given in the video below. Simply click on the arrow in the centre of the screen to begin.
Method
Well, how can I follow that? In the first instance, you may note that there are no specified ingredients in tonight's post. That is quite deliberate and down to the fact that a Burns' Supper is not big on quantities. It is about whisky, haggis, tatties, neeps and whisky - yes, I know! :)
The first step is to determine the cooking instructions for the haggis which you have purchased. They will vary hugely but will either be provided on the packaging or by your butcher. If you have a haggis of about half a pound, it may well feed four people - I am not joking! When the haggis' intestine is burst, the meat "flows" forth, so allow for around two pounds of potatoes and a whole suede turnip.
Haggis is usually boiled in the skin but may be required to be cooked in the oven. Your tatties will require to be peeled and cooked for around twenty-five minutes in simmering, salted water. Your turnip (neeps) will take slightly less time, so get the tatties on before preparing the turnip.
The parsnip and pea mash that accompanies our meal tonight takes the least cooking time of all. The parsnip should be peeled and simmered in salted water for ten minutes. At that time, two handfuls of frozen garden peas should be added, and cooked for a further three minutes.
When everything is ready, the tatties should be mashed, as should the neeps, separately. The haggis should be put in to a dish, to be mixed with a fair dram of the single malt. The parsnip and peas should also be drained and mashed.
A bowl should then be lined with clingfilm and firstly the haggis, then the tatties, then the neeps added, in equal portions. The mix should be pressed down firmly before being up-ended on to a plate. The edges of the clingfilm should then be held while the bowl is removed and the clingfilm subsequently pulled away.
The parsnip and pea mix should be shaped with a couple of teaspoons and added as garnish, along with a wee sprig of parsley.
PS Fancy a pudding/dessert? You can't go far wrong with Cranachan...
Sunday, 24 January 2010
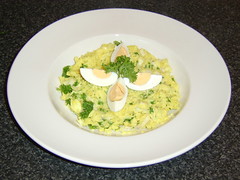
Kedgeree - The Totally Scottish Curry!
There are those who will claim that Kedgeree was brought back from India by His Majesty's Forces serving there and made in to a British breakfast dish. In a sense, these people are not wrong, but they are missing out the previous history and creation of Kedgeree and creating an entirely false impression. Kedgeree was devised in Scotland in the late Eighteenth Century by a number of soldiers who had served with His Majesty's Forces in India. They in turn took the dish to India, where it became popular, and was re-introduced to Great Britain as that famous breakfast dish. The recipe for Kedgeree was first published in a Scottish Recipe Book as far back as 1790 - so it is by no means impossible that The Bard himself enjoyed a plate of it at some point!
Kedgeree is a dish like so many in that the way in which it is made and the ingredients which are included in it have both been "improved" over the years by a variety of cooks and chefs. The recipe which I have prepared is as simple as I could reasonably make it to be and is for two people.
Ingredients
4oz basmati rice
1/2lb smoked haddock fillet (undyed)
3/4 pint of semi-skimmed milk
2 eggs
1/2 small onion (very finely sliced)
1/2 tsp turmeric
1/2 tsp paprika
1/4 tsp ground coriander seed
1 tbsp freshly chopped parsley
Salt and freshly ground black pepper
Method
It is important in the first instance - as always when cooking eggs - that the eggs be removed from the refrigerator and allowed to reach room temperature a couple of hours in advance. Eggs which are cooked straight from the refrigerator, in whatever way, will not produce quality results.
The smoked haddock should be placed in a large pot and the cold milk and spices added. The milk should be brought to a simmer and the smoked haddock cooked for around seven or eight minutes. After this time, the fillet should be removed from the pot with a spatula and sat on a plate to cool enough for handling.
The rice should be washed thoroughly and added to the spiced milk along with the onion. The milk should be brought back to a simmer for a further ten to twelve minutes. The eggs should now be added to a pot and enough cold water added to comfortably cover them. The water should be brought to a rolling boil and the heat then reduced until the water is gently simmering for about eight minutes.
The skin should now be removed from the smoked haddock fillet and discarded. The fillet should be very gently broken in to flakes, feeling for any stray bones which should be removed and discarded with the skin. The flakes of fish should then be re-added to the pot with the rice for the last couple of minutes of cooking time. The milk should by this stage be almost totally absorbed and care is required to ensure that the Kedgeree does not dry out completely and burn.
The eggs should be run under cold water and carefully shelled before being quartered as shown in the picture. The parsley and required seasoning should be stirred through the Kedgeree only at the very last minute prior to serving.
Labels:
kedgeree,
rice,
scottish curry,
smoked haddock
Thursday, 21 January 2010
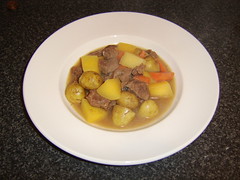
Hale and Hearty, Scottish Venison and Vegetable Stew
This is the sort of hale and hearty, traditional Scottish stew that would regularly have been consumed in Rabbie Burns' time, made not necessarily with venison but - perhaps more commonly - with maybe beef or lamb. As Burns' birthday of course fell at one of the coldest times of the year in Scotland, it is not difficult to imagine him and his family seated around the open fire, upon which a stew such as this simmered in a cast iron pot.
This is therefore a recipe which is prepared as it would have been centuries ago. There are no modern chemicals in it (as there rarely are in my recipes) and there are no complicated appliances required in order to make it. This recipe quantity should provide a great meal for two people at any time of year but particularly on a cold, Winter's night.
Ingredients
1lb diced Scottish venison loin
1/2lb small potatoes
1/2 turnip
1 large carrot
2 pints fresh beef stock
2 tbsp plain (all-purpose, in USA) flour
1oz butter
Salt and freshly ground black pepper to taste
Method
The first step is to put the beef stock on to heat while the venison is prepared. The venison chunks should be washed in cold water to remove the excess blood, then dried with paper kitchen towel or a clean tea towel. The flour should then be added to a bowl, seasoned well with salt and pepper and the venison pieces dipped in to coat them lightly. The butter should be melted in the stew pot and the venison added to quickly brown and seal over a medium heat. The hot stock should be poured in, brought back to a simmer and the simmer maintained for two hours, with only an occasional stir required as well as a check on the liquid level. Hot water should be added, as and if required.
The skin should be left on the potatoes but the turnip should be peeled and the carrot scraped. The vegetables should then be chopped to an approximately uniform size of about one inch chunks. After the venison has been simmering for two hours, the vegetables should be added to the pot along with more water if required and the stew simmered for a further half hour before being served immediately in bowls, while still piping hot.
Tuesday, 19 January 2010
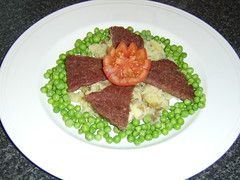
Not Quite Bangers and Mash...
Bangers and mash is a very popular dish in the UK. It is basically sausages served in or on top of mashed potatoes. This dish is sausages served on crushed - as opposed to mashed - potatoes but probably looks a great deal different to most people familiar with bangers and mash.
The principal reason why this dish is so different from bangers and mash is that the sausages used in it are Lorne sausages, a type of sausage peculiar to Scotland and certain parts of the North of England. These are sausages where, rather than being stuffed in to skins, the sausage meat is compressed in to large blocks which are subsequently sliced to form the sausages. Although Lorne sausages were not around in the time of Rabbie Burns, they are a hugely popular item in Scottish cuisine today.
The following recipe is in the quantities required per person.
Ingredients
2 Lorne sausages
6 to 8 small new potatoes
Handful of frozen peas
1 clove of garlic
A knob of butter
Half a tomato for garnish (if desired)
Method
The new potatoes should be left whole and unpeeled, placed in to a pot of boiling, salted water and simmered for twenty-five to thirty minutes until soft. The Lorne sausages should be grilled and will take around three minutes each side under a medium to hot grill in order to cook. This should be timed so far as possible to coincide with the potatoes being ready.
The peas will only take about three minutes in boiling water to cook and should therefore be put on immediately prior to draining and starting to finalise the preparation of the crushed potatoes. When drained, the potatoes should be placed in a bowl and crushed with a fork. The butter and crushed or grated garlic clove should then be added and the mixture stirred. The potatoes should then be arranged on a plate, the Lorne sausages sliced in half diagonally and arranged on top as shown in the photograph and the peas drained and arranged round the edges of the plate. The tomato may then be placed on top as a final garnish.
Monday, 18 January 2010
Gordon's Interpretation of Cullen Skink
This is my own version of the classic Scottish soup, Cullen Skink. The soup is traditionally made from smoked haddock, potatoes and onions - as it is here - but the potatoes are more normally mashed and added to the liquid of the soup, while parsley would be the more common herb employed in the recipe. I very much hope that you will try and enjoy my own slight variation on the theme. The quantities in this recipe are for one person.
Ingredients
1 skinless fillet of smoked haddock
6 small new potatoes (unpeeled)
1/2 medium white onion (thinly sliced)
1 pint of semi-skimmed milk
1 tbsp roughly chopped coriander (cilantro in the USA)
Freshly ground black pepper to taste
Method
The potatoes should simply be washed and halved and added to a pot of salted, boiling water for around twenty to twenty-five minutes until they just start to go soft. In the interim, the cold milk, onion and haddock should be placed in a large pot and the milk brought to a simmer. The milk should continue to be simmered for around ten minutes, until the haddock is cooked. At this stage, the haddock should be removed from the pot with a fish slice and broken in to moderately small flakes, at the same time feeling for any bones which may remain and discarding them.
The haddock, potatoes, chopped coriander and black pepper to taste should then be added to the soup pot with the milk and onion and re-heated. The Cullen Skink should then be served immediately, piping hot.
Labels:
coriander,
cullen skink,
scottish soup recipe,
smoked haddock
Sunday, 17 January 2010
Battered Haddock Fillet with Healthy Option Chips and Salad
Battered fillet of fish served with chips is most often thought of as a most unhealthy concoction. This is because the fish and the chips are normally fried in hot fat, such as beef dripping, and can often be very greasy as a consequence. In this instance, however, the battered fish is fried in sunflower oil and the chips are cooked in the oven.
Ingredients (Per Person)
1 skinless fillet of haddock
1 large Maris Piper potato
1 tomato
4 large lettuce leaves (shredded)
1/2 small onion (finely sliced)
1 tbsp plain flour
Refrigerated soda water
Salt
Sunflower oil
Slice of fresh lemon
Method
The oven should be put on to preheat to 400F/200C/Gas Mark 6. A baking sheet lightly covered with sunflower oil should be placed inside to also heat. The potato should be washed but not peeled then sliced and cut in to chip sized pieces. If you prefer to peel the potato, that is of course fine. When the oven is heated, the chips should be placed on the baking sheet, carefully shaken around to coat them in the oil and placed in the oven for around twenty-five minutes, being removed to be shaken again half-way through cooking.
A large pan should be filled with sunflower oil to a depth of around two inches and the oil heated until it splutters angrily when a little cold water is shaken in to it. The flour should be seasoned with salt and enough cold soda water stirred in to it to bring it to a consistency of thick custard. The fish should then be dragged through the batter and added to the oil, to fry for two minutes each side.
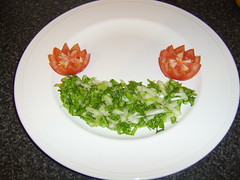
While the fish is cooking, the lettuce, onion and tomato should be prepared and plated as shown. The way in which I have carved the tomato is not essential but it is fairly easily performed with a small paring knife. The slice of lemon should be cut and twisted to serve as the final garnish for the fish.
Friday, 15 January 2010
Beef Wellington with Potato and Parsnip Tower and Peas
Beef Wellington is a delicious way of preparing a quality fillet of beef. It is often perceived for some reason as being difficult to make but the reality could not be further from the truth.
Ingredients (For Two people)
1/2lb fillet of beef
6oz puff pastry
3 rashers of unsmoked bacon
1 medium parsnip
2 medium potatoes
Frozen peas as required
1 egg for glazing
Sunflower oil for frying
Butter for greasing baking tray
Freshly ground black pepper
Method
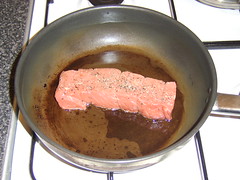
The first step when making Beef Wellington is to seal the fillet of beef in a frying pan with a little sunflower oil. The beef should be seasoned with freshly ground black pepper then added to the heated pan and cooked for around half a minute on a high heat on each side until fully sealed. Do not forget to seal the two ends as well as the four sides. The beef should be held upright with cooking tongs at this stage. When the beef is sealed, remove the pan from the heat and allow the beef to rest and cool.
When the beef is cool, three rashers of bacon should be laid out side by side on a large sheet of clingfilm and the beef placed lengthwise in the centre. The bacon rashers should then be wrapped tightly around the beef and the clingfilm sealed, the ends twisted like a Christmas cracker. The parcel should then be refrigerated for at least an hour.
Put the oven on to preheat to 400F/200C/Gas mark 6. Take one third of the pastry and roll it on on a floured board to a thickness of about an 1/8" and so that it is large enough to accomodate the beef fillet with a border remaining of at least 1/2" all the way round. Transfer the pastry on to a baking sheet lightly greased with butter and unwrap the beef and bacon parcel, sitting it carefully on to the pastry.
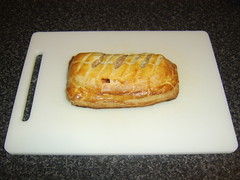
The remaining pastry should then be rolled out to a similar thickness and to a size where it is going to be large enough to snugly cover the fillet and seal around the edges of the bottom sheet of pastry. The beef fillet and the borders of the bottom sheet of pastry should then be brushed with beaten egg and the larger sheet of pastry carefully placed on top, pressed in to a snug fitting position and sealed gently around the edges between forefinger and thumb. Three small slits should then be made on the top of the pastry to allow steam to escape during cooking and the parcel glazed with the remaining egg mixture. The tray should then be placed in the oven for around twenty-five minutes, until the pastry is golden brown.
The parsnip should then be scraped and the potatoes thoroughly washed. The parsnip and the potatoes should then be sliced across the way in to 1/4" thick discs. Immediately before the Beef Wellington is removed from the oven, the discs should be added to a pot of boiling, salted water and simmered for a total of fifteen minutes.
The Beef Wellington should then be removed from the oven, placed on a plate and covered loosely with aluminium foil to rest, while the potato and parsnip discs cook. The peas should be added to another pan of boiling water and simmered - per the instructions on the pack - for what is usually around three minutes.
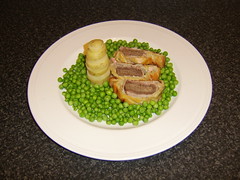
The potato and parsnip discs and the peas should be drained and the potato and parsnip discs used alternately to assemble a tower as shown in the top photograph in this recipe. The Beef Wellington should be thickly sliced with a very sharp carving knife and served with the peas, as also shown.
Cooking with Beef
Beef is one of my favourite cooking ingredients and there are of course so many different ways in which it can be cooked and so many different recipes which can be prepared using beef. The book below has to rate as one of the definitive beef cookbooks available on the market today, focusing not only upon beef recipes but how to cook lean beef in a healthy fashion. It is also presently available at bargain prices in the book stores/shops of both Amazon.com and Amazon.co.uk.
Wednesday, 6 January 2010
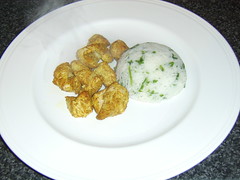
Biryani Spiced Turkey with Garlic and Herb Rice
I am aware that there are many who may not yet be able to face turkey in the aftermath of Christmas and - perhaps - Thanksgiving. This turkey recipe is very different, however, from the beautifully roasted bird which is generally served up on such special occasions. This is diced turkey thigh, roasted in a Biryani style spice mixture, and served with garlic and herb boiled rice.
Ingredients (Serves Two People)
1/2lb diced turkey thigh
5oz basmati rice
1 garlic clove (crushed or grated)
1 tbsp freshly chopped flat leaf parsley
1/2 tsp ground turmeric
1/2 tsp ground cumin seeds
1/4 tsp ground coriander seeds
1/4 tsp chilli powder
Salt
Method
The first step in this recipe is to dry marinate the diced turkey thigh in the spices. The meat and spices should simply be mixed thoroughly together in a small glass bowl to ensure even coating, covered with clingfilm and refrigerated for at least an hour.
The oven should be pre-heated to 400F/200C/Gas Mark 6. The turkey pieces should be spread out evenly on a sheet of aluminium foil on a baking tray and the foil wrapped in to a loose but sealed parcel. Note that no form of oil or liquid should be added and the turkey should be cooked for around twenty-five minutes. Be careful to ensure that the turkey is properly cooked.
The rice should be washed and added to a pan of boiling, salted water, where it should be simmered for twelve minutes. It should then be thoroughly drained before being mixed with the parsley and garlic. A small ramekin or similar dish may then be lined with clingfilm before the rice is packed tightly inside. Turn the dish carefully upside down on to the plate and holding the edges of the clingfilm, lift off the dish. The clingfilm should then be carefully peeled away before the turkey is added to the plate.
More Indian Recipes For You to Try
Madhur Jaffrey has been a highly respected creator of top quality Indian dishes for a great many years. In the book featured below - on both Amazon.com and Amazon.co.uk - she concentrates upon showing how easily you can produce those tantalising Indian dishes which you have previously had to visit a restaurant to sample. Snap up this bargain book today and see how easy it is to create superb Indian dishes in the comfort of your own kitchen!
(Note If you would prefer to browse Amazon yourself for books on Indian cooking, simply click on the relevant link: Amazon.com or Amazon.co.uk)
Subscribe to:
Posts (Atom)